
Dehydrating Veggies for Chips: Easy DIY Vegetable Dehydrator Recipe. Create crunchy veggie chips! Follow Dehydrating Veggies for Chips via our Easy DIY Vegetable Dehydrator Recipe quick & healthy
Why Choose Homemade Veggie Chips with a DIY Dehydrator?
Crafting your own crunchy snacks using a DIY Vegetable Dehydrator Recipe empowers you to control ingredients & flavors. Commercial chips often pack in excess oil, salt, & additives. When you follow a Dehydrating Veggies for Chips: Easy DIY Vegetable Dehydrator Recipe, you pick fresh produce, choose quality seasonings, & limit added sodium. This approach aligns with a health-conscious lifestyle because you avoid artificial preservatives. You also reduce waste by using surplus garden harvests. The dehydrating process retains most nutrients & yields long-lasting snacks. By building or adapting a simple dehydrator at home, you slash costs compared to electric models. You gain hands-on experience in food preservation while tailoring batches to personal taste. Crispness emerges through controlled temperature & airflow, ensuring uniform results. Each tray delivers lightly seasoned kale, sweet potato, or beet chips with vibrant color & satisfying texture. Embracing homemade veggie chips inspires creativity & fosters mindful eating. With this method, you prepare snacks that deliver both flavor & nutrition without compromise.
| Benefit | Impact |
|---|---|
| Ingredient Control | Choose fresh produce & seasonings |
| Cost Efficiency | Use existing kitchen tools or low-cost setup |
| Nutrient Retention | Preserve vitamins & minerals with low heat |
Selecting the Best Vegetables for Crispy Chips
Choosing produce with low moisture content speeds up the drying phase & yields consistently crisp chips. Root vegetables like sweet potatoes, beets, & parsnips slice cleanly & hold vibrant hues after dehydration. Leafy greens such as kale & spinach produce delicate, brittle snacks when dried properly. Zucchini, carrots, & bell peppers also transform into flavorful crisps once moisture exits. Prioritize firm, blemish-free specimens to avoid mold risks & uneven drying. Smaller vegetables cut down on prep time, while larger ones require uniform slicing techniques to balance thickness. Seasonal availability often dictates price & freshness; local farmers markets supply produce at peak ripeness. Combining multiple vegetable types on different trays introduces variety without extending drying duration if arranged by similar water content. This strategy helps you finish each batch within predictable time windows. Sourcing organic or homegrown vegetables eliminates concern about pesticide residue as you concentrate flavors during dehydration. By thoughtfully picking fresh plant material, you set the stage for exceptional crunchy munchies.
Vegetable Selection Criteria
- Low moisture levels for quicker drying
- Firm texture to avoid mushiness
- Uniform size & shape when possible
- Seasonal produce for peak flavor
- Organic or homegrown to reduce chemicals
Prepping Vegetables: Techniques for Uniform Slices
Even slice thickness ensures equal dehydration across all chips. A mandoline slicer delivers precise cuts between two & four millimeters. Vegetables thicker than four millimeters may remain leathery, while slices thinner than two millimeters can become brittle too fast. Washing & peeling root crops remove soil residue & tough skins. Leaves get a gentle massage in cool water to eliminate dirt. After rinsing, arrange slices on a clean towel or wire rack to air dry for a few minutes to remove surface moisture. For intricate shapes like bell pepper rings use a sharp chef’s knife. Stagger each slice’s position in a single layer on trays to prevent overlap. If you lack a mandoline, steady knife skills suffice; just keep slices consistent. Rotate trays halfway through drying to compensate for airflow variations in a DIY Vegetable Dehydrator Recipe. Document slice thickness & drying times in a kitchen notebook to refine your personal protocol. Accurate preparation sets the foundation for chips that crisp evenly from edge to edge.
| Step | Purpose |
|---|---|
| Wash & Peel | Remove dirt & tough skins |
| Slice Evenly | Ensure uniform dehydration |
| Pat Dry | Eliminate surface moisture |
| Arrange on Trays | Avoid overlapping slices |
Natural Seasoning Blends to Elevate Flavor
Seasoning lifts the plain taste of dehydrated vegetables into savory delights. A simple mix of sea salt, cracked black pepper, & garlic powder enhances the natural sweetness in root chips. For a smoky twist, blend smoked paprika, onion powder, & a pinch of cayenne. Herbs like rosemary or thyme pair beautifully with Mediterranean-inspired blends; finely chop fresh leaves before tossing slices. Nutritional yeast creates a cheesy profile without dairy. To distribute spices evenly, mist vegetable surfaces lightly with water or olive oil. Then sprinkle seasoning from a height to avoid clumping. Shake trays gently to reposition slices & encourage uniform coverage. Experiment with citrus zest, ginger powder, or curry powder to explore global tastes. Document each blend’s ratios so you replicate favorites. When you follow a Dehydrating Veggies for Chips: Easy DIY Vegetable Dehydrator Recipe, seasoning addition at the correct stage before or after drying determines final aroma & texture. Pre-seasoning can infuse deeper flavor, while post-dry seasoning ensures crispiness stays intact.
Popular Spice Mixes
- Sea Salt + Black Pepper + Garlic Powder
- Smoked Paprika + Cayenne + Onion Powder
- Rosemary + Thyme + Lemon Zest
- Nutritional Yeast + Salt + Black Pepper
- Cumin + Coriander + Turmeric
Setting Up Your DIY Vegetable Dehydrator
Transforming ordinary household items into a functional dehydrator saves money & maximizes kitchen utility. Stackable wire racks or baking sheets work well if your oven offers a low-temperature setting with convection. For a no-oven option, build a simple wooden box with screened trays. Install a small fan at one end to drive air across racks. Place a lightbulb or ceramic heat emitter inside for gentle heat. Maintain door ventilation holes to avoid humidity buildup. Calibrate temperature with an inexpensive digital thermometer so you hold steady between 120°F & 140°F. Align trays to allow one-inch gaps for airflow. Label each tray level to keep track of vegetable type & batch date. Periodically check the fan’s capacity & clean dust to maintain efficiency. Adhering to electrical safety standards ensures you operate risk-free. Whether you adapt an existing appliance or assemble parts from a hardware store, your DIY Vegetable Dehydrator Recipe becomes a creative project that yields satisfying results each time.
| Component | DIY Option |
|---|---|
| Racks | Wire cooling racks or screened trays |
| Heat Source | Oven on low setting or lightbulb assembly |
| Airflow | Small fan or convection oven mode |
| Thermometer | Digital probe for accuracy |
“Dehydrating Veggies for Chips: Easy DIY Vegetable Dehydrator Recipe delivers an effortless route to nutritious snacking.” – Jerry Murphy
Temperature & Timing Guidelines for Optimal Results
Temperature control makes or breaks crispness. Set your DIY system to around 125°F for leafy greens; they dry fast & burn easily if heat spikes. Root vegetables tolerate up to 135°F, speeding up moisture removal while preserving color. Monitor trays at two-hour intervals during the initial phase, then hourly as slices near dryness. Typical drying times range from four to eight hours, depending on humidity levels & slice thickness. Rotate trays top to bottom halfway through to even out exposure. Use a hygrometer in enclosed setups to track relative humidity; aim for under 20% inside the dehydrator. If humidity climbs above 30%, briefly prop the door to vent moisture. Document ambient conditions like kitchen temperature & weather so you refine future batch timings. Precise timing ensures each chip reaches a shatter-crisp state rather than bending under pressure.
Recommended Drying Durations
- Kale Chips: 4–6 hours at 125°F
- Sweet Potato Slices: 6–8 hours at 135°F
- Beet Rounds: 7–9 hours at 130°F
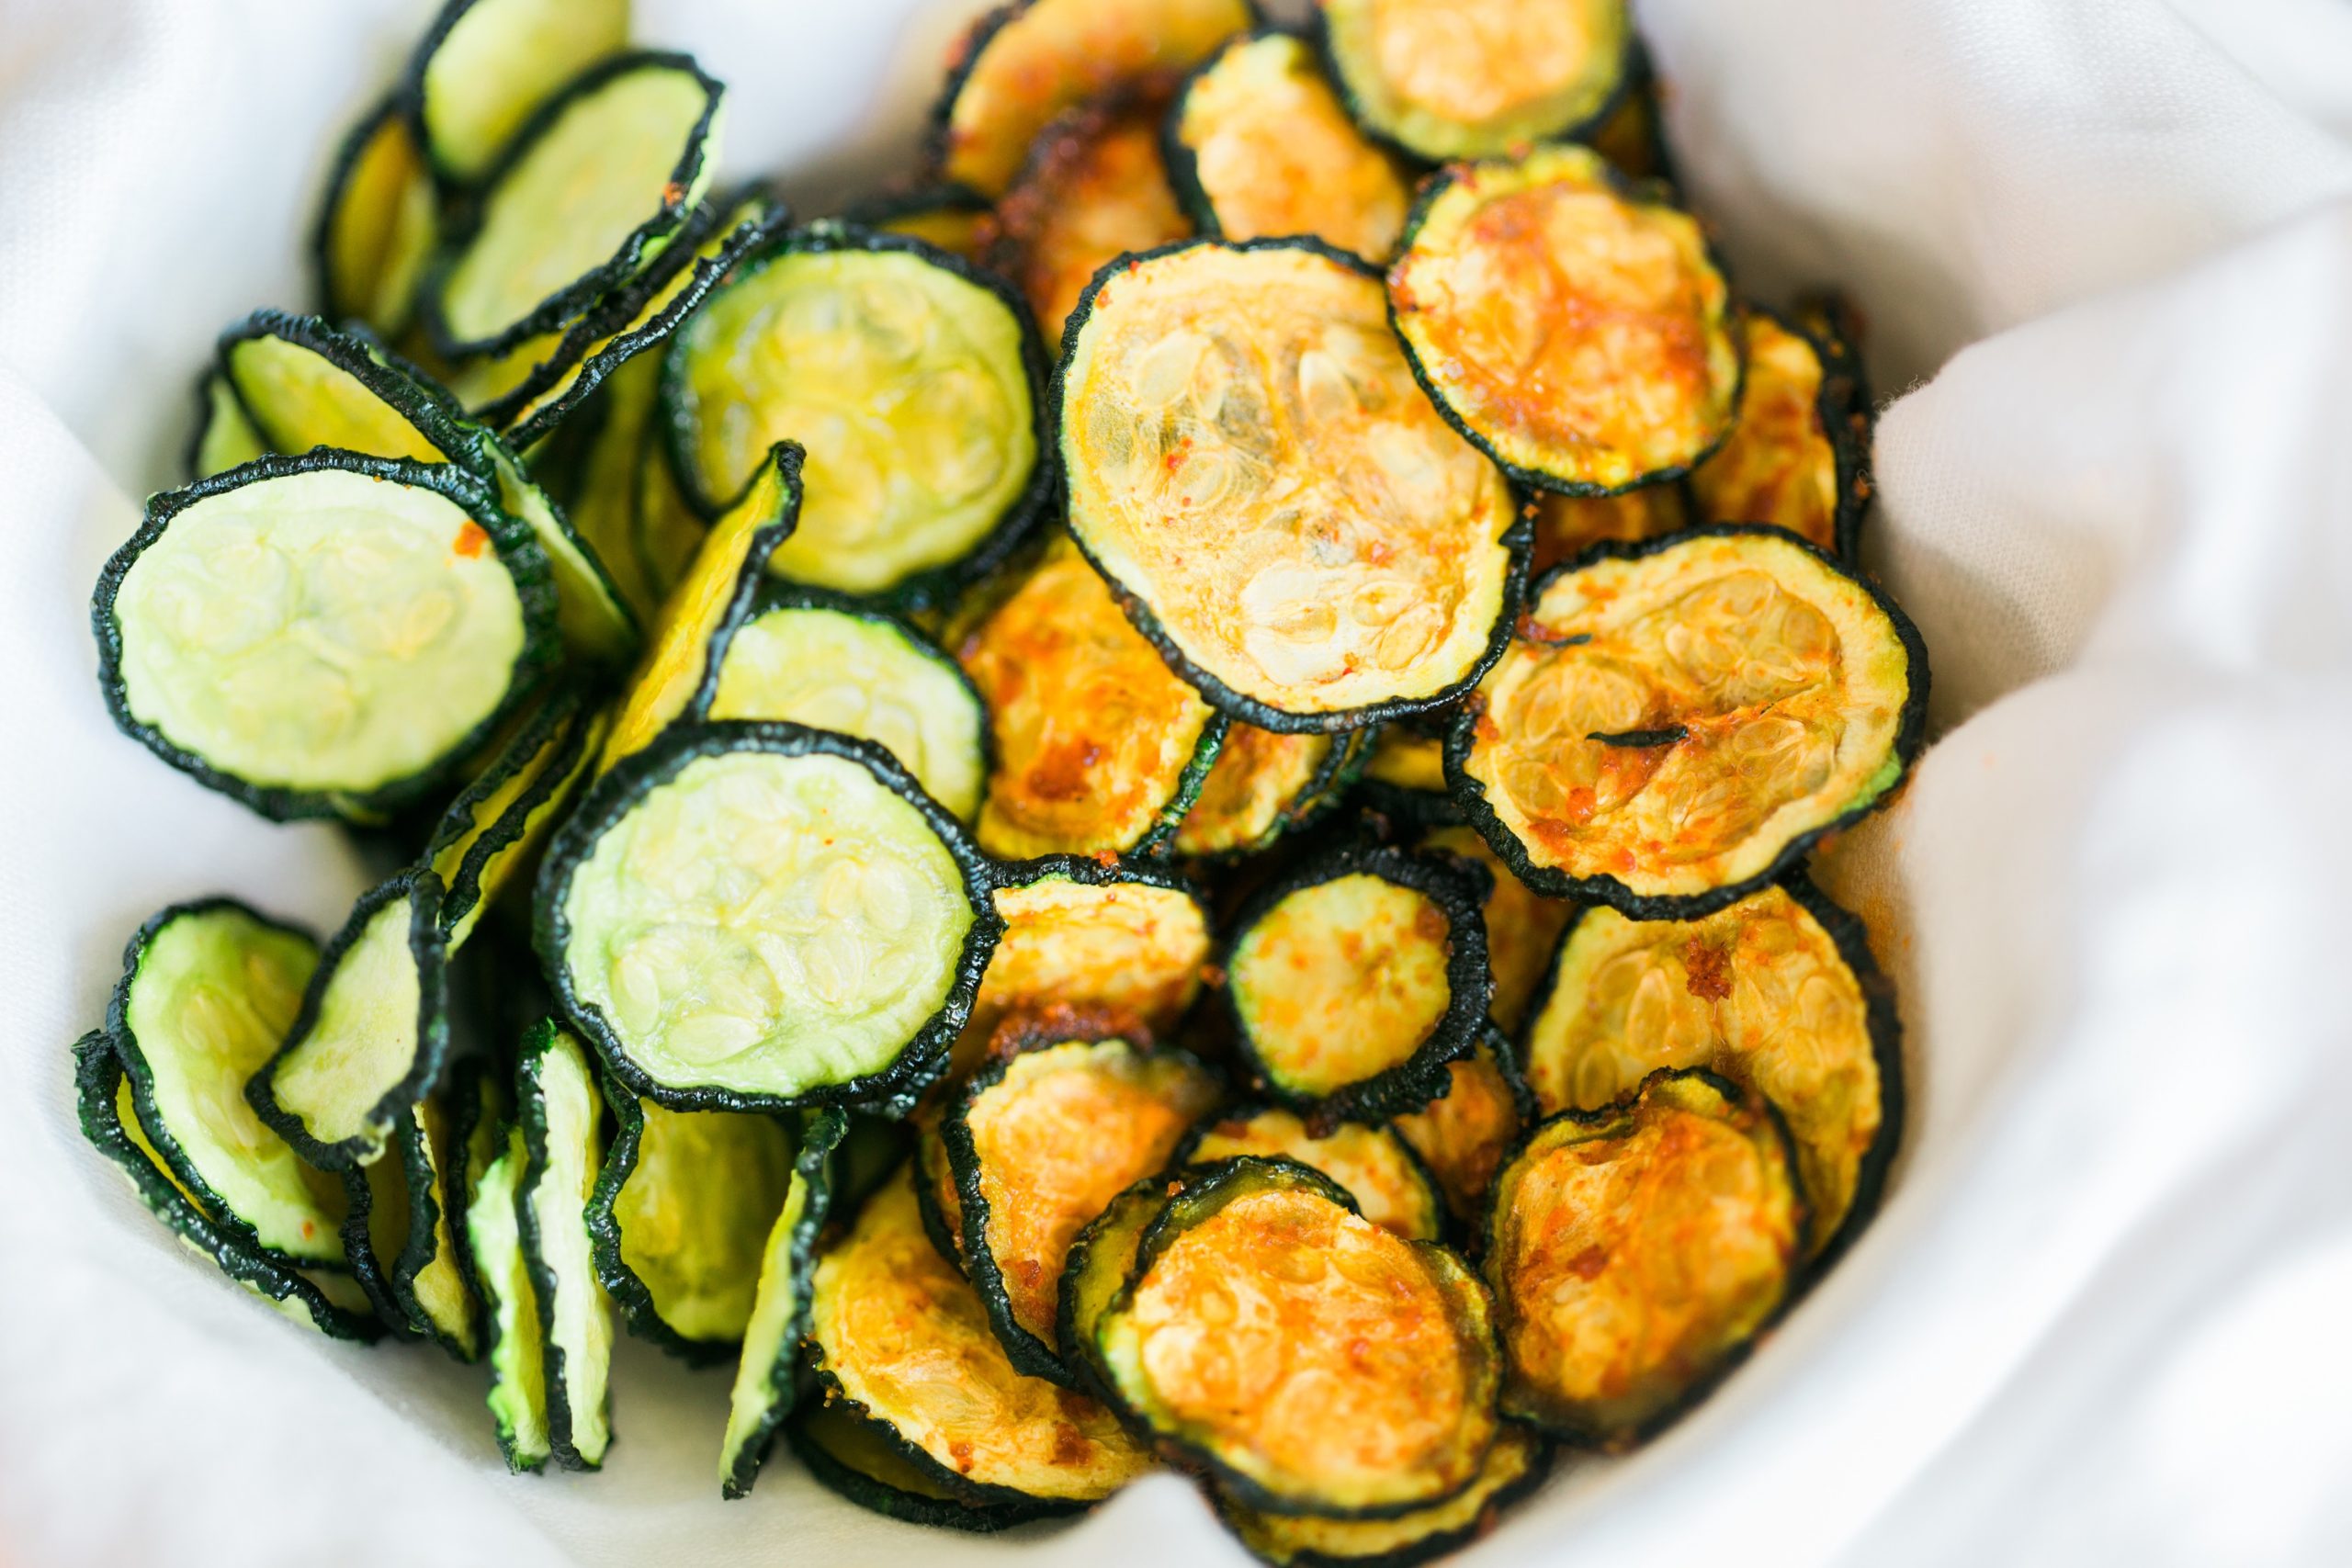
- Zucchini Wheels: 5–7 hours at 125°F
- Bell Pepper Rings: 4–6 hours at 130°F
Testing for Crispness: When Are Chips Done?
Assess chip readiness by pressing gently; they should snap rather than bend. Take one sample from each tray corner to check consistency. If edges crack while the center remains soft, return them for an additional hour of drying. Too much dryness turns chips to dust, so watch closely toward the end. Record the mass of a sample slice before & after dehydrating to calculate moisture loss percentage. Aim for less than 10 percent residual moisture. For safety, preserve dried samples in a sealed jar for 24 hours; if no moisture appears on the jar walls, chips have fully dried. Ensure crispness holds over time, as partially dried snacks risk mold growth. Achieving the ideal snap tests both your temperature control & slice uniformity techniques. With practice, you develop a sixth sense for that perfect crunch.
| Test Method | Indicator |
|---|---|
| Bend Test | Slice snaps cleanly |
| Moisture Loss | <10% residual moisture |
| Jar Storage | No condensation after 24 hours |
Storing & Preserving Your Dehydrated Veggie Snacks
Proper storage locks in crispness & extends shelf life for months. Use airtight glass jars or vacuum-sealed bags to block air & humidity. Place a food-safe moisture absorber or oxygen packet inside each container. If you lack oxygen absorbers, include a small piece of paper towel to soak up stray moisture. Store jars in a cool, dark cupboard away from direct sunlight, which can degrade color & flavor. Label containers with the dehydration date & vegetable type. Rotate older batches forward to ensure first-in, first-out consumption. Periodically inspect jars for any signs of moisture or mold; discard any suspect chips immediately. For portion control, divide chips into single-serving packets. This prevents repeated opening of one large container, which can introduce humidity. Effective storage preserves both texture & vibrant natural hues achieved through the Dehydrating Veggies for Chips: Easy DIY Vegetable Dehydrator Recipe.
Storage Best Practices
- Airtight glass jars or vacuum bags
- Include oxygen or moisture absorbers
- Cool, dark environment away from heat sources
- Label with date & veggie type
- Use FIFO rotation to maintain freshness
Creative Serving Ideas for Vegetable Chips
Offer homemade chips alongside dips or spreads for a gourmet snack board. Pair sweet potato crisps with guacamole or tzatziki. Serve beet chips with whipped feta or herbed goat cheese for vibrant color contrast. Kale chips complement hummus & baba ganoush. Include mixed-chip bowls featuring zucchini, carrot, & bell pepper slices for a rainbow presentation. Top a bowl of chips with chili-lime salt & cilantro for a festive twist. You can crush crisp chips over salads to add texture without frying. Use them as crunchy taco shell alternatives or garnish soups to introduce novelty. Incorporating your DIY Vegetable Dehydrator Recipe creations into everyday meals impresses guests & elevates snack time. Design tasting flights by seasoning separate batches with paprika, curry blend, & lemon-pepper to showcase versatility.
| Chip Type | Serving Suggestion |
|---|---|
| Sweet Potato | Paired with guacamole |
| Beet | Served with whipped feta |
| Kale | Complemented by hummus |
| Zucchini | Used as taco garnish |
Troubleshooting Common Dehydrating Issues
Uneven drying typically stems from inconsistent slice thickness or airflow blockages. Ensure trays sit level & rotate them periodically. If chips stick to trays, apply a light coat of cooking spray or line racks with food-grade silicone sheets. Burning or browning indicates temperature set too high; lower by five to ten degrees & extend drying time. Mold growth arises from incomplete dehydration; increase duration or reduce tray spacing to enhance airflow. Sticky edges signal excess sugar in vegetables; dust slices lightly with cornstarch before drying. If ambient humidity remains high, prop the dehydrator door or use a dehumidifier in the room. When seasoning clumps, mist slices sparingly or mix spices with rice flour for better adhesion. Addressing each issue promptly refines your Dehydrating Veggies for Chips: Easy DIY Vegetable Dehydrator Recipe approach & leads to flawless results.
Problem-Solution Pairs
- Uneven Drying: Rotate trays & maintain slice uniformity
- Chips Sticking: Use silicone liners or light cooking spray
- Over-Browning: Lower temperature & increase time
- Mold Appearance: Extend drying or reduce tray overlap
- Clumpy Seasoning: Add rice flour or mist sparingly
Sustainability Benefits of DIY Vegetable Dehydrator
Building your own dehydrator reduces reliance on single-use packaging & limits food waste. You use surplus or imperfect produce that might otherwise spoil. Dehydrating extends shelf life by removing moisture, slashing the need for refrigeration & cutting electricity bills. A homemade unit often draws minimal power compared to larger commercial models. When you refine your DIY Vegetable Dehydrator Recipe, you encourage sustainable habits in your household. Sharing or gifting dehydrated snacks fosters community ties & promotes eco-friendly practices. Compost any trimmings or vegetable scraps to nurture your garden. This closed-loop approach exemplifies resourcefulness & environmental responsibility. Embracing a small-scale preservation method demonstrates that accessible projects can create nutritious snacks while benefiting the planet.
| Eco Aspect | Benefit |
|---|---|
| Waste Reduction | Preserve surplus produce |
| Energy Efficiency | Lower power usage than large units |
| Packaging Elimination | Use reusable jars |

Selecting Fresh Vegetables for Optimal Dehydration
Choosing vibrant, firm produce lays the foundation for a successful Dehydrating Veggies for Chips: Easy DIY Vegetable Dehydrator Recipe. Freshness ensures maximum flavor retention as moisture is removed over low heat. Look for vegetables with low water content like zucchini, green beans, & sweet potatoes; these varieties crisp up beautifully without sogginess. Remove any blemishes or bruised spots before dehydrating so that every slice dries uniformly. Harvest from a farmer’s market or garden for peak ripeness, since under-ripe pieces can result in a bland snack. Once you’ve assembled a colorful mix, cold-storage immediately or begin processing within a day to prevent the development of mold or off-flavors. This initial step carries more weight than high temperature or seasoning your chips depend on the inherent taste & texture of these raw ingredients. By selecting prime examples of each vegetable, you guarantee a crunchy, flavorful chip that appeals to both eyes & taste buds in your home kitchen setup.
Ideal Vegetable Choices
- Carrots – Sweetness intensifies & adds bright orange color.
- Zucchini – Mild flavor & firm flesh yield light, crisp chips.
- Beets – Earthy taste As well as deep red hue make standout chips.
- Sweet potatoes – Natural sugars caramelize for rich sweetness.
- Kale leaves – Thin leaves dry quickly into delicate, airy chips.
Proper Washing Techniques to Prevent Contamination
Before any slicing or seasoning, washing vegetables thoroughly removes dirt, bacteria, & pesticide residues, which can cause off-flavors or health risks. Begin by rinsing produce under cold running water, gently scrubbing with a brush on root vegetables like potatoes & carrots. Leafy greens should be soaked briefly in a large bowl of water, allowing sediment to settle at the bottom, then lifted out & rinsed again. For hard-skinned items such as beets, a firm scrub ensures crevices are cleaned. After washing, pat each piece dry using a clean kitchen towel or paper towels to eliminate excess moisture that could slow drying time. By adopting consistent washing methods, you reduce the chance of spoilage during dehydration, while preserving the natural color & taste that make your chips inviting. Effective cleaning pairs with smart selection to deliver a safe, delightful snack in your DIY Vegetable Dehydrator Recipe.
Washing Steps Comparison
| Produce Type | Cleaning Method |
|---|---|
| Root Vegetables | Scrub under running water |
| Leafy Greens | Soak then rinse thoroughly |
| Firm-Skinned | Brush & rinse |
| Soft Fruits | Gentle rinse with hand |
Consistent Slicing for Even Drying
Uniform thickness in each slice is critical for chips to dehydrate at the same rate. If slices vary widely, some will burn while others retain moisture & remain pliable. Use a sharp knife or a mandoline set to 1/8-inch thickness for most vegetable chips. Softer vegetables like zucchini may require 1/16-inch to achieve maximum crispness. Cutting on a stable surface helps maintain even pressure, preventing jagged edges that dry unevenly. Organize slices on trays with a bit of space between them, so heat & airflow can circulate freely. This step influences total drying time & final texture more than any seasoning application. Invest a few extra minutes here, & you’ll save hours of guesswork at the end. Even slicing paired with a well-ventilated arrangement transforms basic vegetables into delightful, snackable crisps that retain bright flavors & valuable nutrients.
Key Slicing Tips
- Use a non-slip cutting board for stability.
- Rotate root vegetables for flat sides against the board.
- Mandoline attachments deliver precise, repeatable cuts.
- Keep blades sharp to reduce tearing of soft flesh.
- Measure thickness with a guide or ruler if needed.
Flavor Infusion: Spices & Herbs for Veggie Chips
Seasoning your slices before dehydration unlocks layers of aromatic flavor that fans of savory snacks will appreciate. Lightly brush each slice with olive oil to help spices adhere, then sprinkle herbs like rosemary or thyme for a Mediterranean twist. Paprika & chili powder impart smoky warmth, while nutritional yeast lends a cheesy, umami-rich profile. For a hint of sweetness, dust slices with cinnamon & a touch of brown sugar. Experiment by combining garlic powder with onion salt, or try curry powder for an exotic flair. This is where a plain chip transforms into a snack masterpiece personalized to your palate. Plan small test batches to balance spice levels; potent seasonings can intensify once moisture is removed. Even a simple dash of sea salt can elevate natural vegetable flavors. Thoughtful flavor infusion ensures that each chip carries a signature taste aligned with your homemade Easy DIY Vegetable Dehydrator Recipe, making snacking both healthy & exciting.
Seasoning Options Comparison
| Spice Blend | Flavor Profile |
|---|---|
| Smoky Paprika Mix | Rich, smoky, mild heat |
| Herb Garden Blend | Earthy with herbal notes |
| Cinnamon Sugar | Sweet & warming |
| Curry Powder | Spicy, exotic depth |
Temperature Settings & Timing Guidelines
Maintaining a consistent low temperature is essential to preserve nutrients & colors in your homemade chips. Aim for 125°F to 135°F on most countertop dehydrators. Leafy greens dry quickly at the lower end, typically within two to four hours, while thicker root slices may require eight to twelve hours at 135°F. Avoid higher heat, which cooks rather than dehydrates & can degrade delicate vitamins. Monitor trays after the first few hours, rotating them front to back to account for hot spots. Keep the door slightly ajar if your unit runs hot, ensuring a gentle, even airflow. Tracking time alongside temperature prevents over-drying, which can lead to brittle, flavorless pieces. By following these guidelines & adjusting for humidity in your kitchen, you’ll consistently produce crunchy vegetable chips through your Vegetable Dehydrator Recipe that retain a nutty, concentrated taste.
Dehydration Time Chart
- Leafy Greens (2–4 hours)
- Zucchini (6–8 hours)
- Sweet Potatoes (10–12 hours)
- Beets (12–14 hours)
- Mixed Vegetables (8–10 hours)
Constructing a Low-Cost DIY Dehydrator at Home
Skipping expensive appliances is possible by repurposing an old box fan & wood frames. Build a simple rack system from untreated pine or cedar & cover each level with clean muslin cloth or fine mesh. Position the box fan at one end & secure it to the frame, directing airflow through the racks. Adjust fan speed to avoid blowing slices off trays low to medium works best. This setup circulates warm air evenly, mimicking any electric dehydrator. Place the unit in a dry, well-ventilated area free from dust. Check joints & mesh seals to keep insects & debris out. With minimal carpentry tools & materials, you achieve a functional unit for a fraction of the cost. This approach proves that a truly easy DIY Vegetable Dehydrator Recipe doesn’t have to break the bank, empowering you to produce healthy chips on demand.
DIY Dehydrator Components
| Component | Description |
|---|---|
| Box Fan | Circulates air through racks |
| Wooden Frames | Structure for mesh trays |
| Mesh Cloth | Supports slices with airflow |
| Adjustable Feet | Leveling on uneven surfaces |
Rack Arrangement & Airflow Management
Proper rack positioning inside your dehydrator ensures uniform drying without overloading any single layer. Space racks at least two inches apart to allow air to flow freely between trays. Place thicker slices on lower tiers, where air temperature is generally higher, & delicate leaves at the top to avoid scorching. Rotating trays every few hours also compensates for minor temperature variations along the stack. Consider adding an extra fan on the exhaust side to pull humid air out quickly if you notice condensation building. This balanced airflow method speeds up drying, reducing overall energy usage. Good management of rack layout translates into crunchy, evenly dried chips that maintain bright colors & full flavor. Once you master tray arrangement, your Dehydrating Veggies for Chips: Easy DIY Vegetable Dehydrator Recipe workflow becomes reliable & efficient.
Rack & Airflow Tips
- Maintain two-inch spacing between trays.
- Place thicker slices on lower racks.
- Use a small exhaust fan to reduce humidity.
- Rotate trays midpoint through drying cycle.
- Keep dehydrator door closed for stable heat.
Identifying Dryness: Signs to Look For
Knowing when your chips are done prevents waste & ensures perfect texture. Properly dehydrated slices will feel crisp & break with a sharp snap. Leafy greens should shatter easily, while root vegetables should display no moisture beads when squeezed. Cut through a sample chip to check its center; if any moisture remains, extended drying time is needed in small increments. Over-drying leads to brittle dust, so aim to stop just before complete fragility. Color darkening often indicates sugars caramelizing, which is acceptable up to light toffee tones but avoid deep browning. Smell each batch: a nutty aroma signals readiness, whereas a burnt scent suggests too high heat or too long drying. By learning these visual, tactile, & olfactory cues, you perfect your batch-to-batch consistency in a DIY Vegetable Dehydrator Recipe without guesswork.
Dryness Indicators
| Indicator | Desired Result |
|---|---|
| Snap Test | Sharp break, no bend |
| Color Check | Light toffee hues |
| Touch Test | No moisture streaks |
| Scent | Nutty, not burnt |
Cooling & Conditioning Dehydrated Chips
Immediately transfer finished chips to a wire rack or plate for 10–15 minutes of cooling. This process equalizes moisture & temperature throughout each piece, preventing sogginess from trapped heat. Once cooled, place chips loosely in an airtight container for two days, shaking the container gently each morning & evening. This “conditioning” step ensures any remaining internal moisture disperses evenly, yielding uniform crispness. If condensation appears on container walls, return chips to the dehydrator for a brief additional cycle. Proper cooling & conditioning locks in texture & flavor, making storage more reliable for weeks or even months. Skip this step & you risk a mix of crunchy & chewy bites, undermining the satisfaction of your Dehydrating Veggies for Chips: Easy DIY Vegetable Dehydrator Recipe.
Conditioning Process
- Cool on wire rack for 10–15 minutes.
- Store loosely in a dry, airtight container.
- Shake container twice daily for two days.
- Check for condensation; re-dry if needed.
- Label with date after conditioning completes.
Packaging Methods to Preserve Crispness
Maintaining chip texture requires moisture-proof packaging. Use vacuum-sealed bags for best results remove air before sealing to prevent oxidation & moisture ingress. In a different context, resealable mylar pouches with oxygen absorbers work well, especially for long-term storage. For short-term snacking, glass jars with rubber gaskets provide a tight seal. Place a small packet of silica gel inside each container to absorb residual humidity. Store containers in a cool, dark cupboard away from heat sources. Avoid plastic bags without oxygen barriers; they allow moisture exchange & reduce crunch. Proper packaging combined with initial conditioning makes your homemade chips last up to six months while staying crisp. Effective storage is as crucial as dehydration itself in a DIY Vegetable Dehydrator Recipe workflow.
Packaging Options
| Method | Pros |
|---|---|
| Vacuum Seal | Maximal air removal |
| Mylar Pouches | Lightproof, moisture barrier |
| Glass Jars | Reusable, airtight |
| Resealable Bags | Convenient, short-term |
Labeling & Rotation for Best Quality
Organize your chip inventory by labeling containers with the dehydration date & vegetable type. Rotate older batches to the front to guarantee you consume them first, ensuring peak quality & safety. Keep a simple log or sticker on each package noting seasoning variations, so you can track flavor favorites & refine recipes over time. By rotating stock every few weeks, you prevent stale or off-flavored chips from lingering. Include a best-before indicator six months out, though most chips remain excellent for up to one year if properly sealed. This systematic approach reduces waste & streamlines your snack routine. A well-maintained rotation & labeling system elevates your Dehydrating Veggies for Chips: Easy DIY Vegetable Dehydrator Recipe practice into an organized kitchen habit.
Rotation Checklist
- Label with dehydration date.
- Note seasoning or flavor blend.
- Place oldest containers in front.
- Record inventory in a log.
- Consume within recommended timeframe.
Pairing Veggie Chips with Dips & Snacks
Enhance the eating experience by serving your homemade chips alongside complementary dips & toppings. Creamy options like hummus or Greek yogurt-based spinach dip create a smooth contrast to crisp textures. Fresh salsa, guacamole, & pesto also highlight the natural vegetable flavors & add juicy layers. For a crunchy fusion, top chips with avocado slices or smoked salmon, then drizzle a touch of olive oil & fresh herbs. Present chips on a tiered platter at gatherings, accompanied by small bowls of spice-infused oil for dipping. This pairing elevates simple snacking into a specialty appetizer, making your Easy DIY Vegetable Dehydrator Recipe the center of attention at parties or game nights. Thoughtful combinations transform basic crisps into a versatile, crowd-pleasing treat.
Serving Suggestions
| Dip | Ideal Veggie Chip |
|---|---|
| Hummus | Carrot, bell pepper |
| Guacamole | Beet, zucchini |
| Salsa Verde | Sweet potato, kale |
| Pesto | Green bean, kale |
Nutritional Profile of Various Vegetable Chips
Dehydrated chips deliver concentrated nutrients without added preservatives or excess oil. Sweet potato chips pack vitamin A from beta-carotene & dietary fiber that supports digestion. Kale chips supply vitamin K, C, & iron, while beet chips offer folate & manganese. Zucchini & green beans contribute potassium & B vitamins. Because water content is removed, these nutrients become more calorie-dense per bite, so portion control ensures you get benefits without overindulging. Comparing labels, you’ll find dehydrated options lower in sodium than commercial potato chips, especially when you season lightly. By incorporating a variety of vegetables in your Dehydrating Veggies for Chips: Easy DIY Vegetable Dehydrator Recipe, you create balanced nutrient intake in snack form, making healthy choices easy & delicious.
Nutrient Breakdown
- Sweet potato: High in vitamin A & fiber.
- Kale: Rich in vitamins K, C, & iron.
- Beet: Good source of folate & manganese.
- Zucchini: Contains potassium & B vitamins.
- Green bean: Offers vitamins A, C, & fiber.
Safety Tips & Hygiene Practices
Maintaining a clean workspace & equipment reduces contamination risks when preparing dehydrated snacks. Sanitize cutting boards, trays, & utensils with hot soapy water before each batch. Avoid cross-contamination by using separate boards for produce & any other ingredients. Keep your dehydrator free from food residue by wiping racks between uses. Inspect fresh produce for mold or decay, discarding any compromised pieces. Store seasonings in airtight containers to prevent moisture absorption, which could lead to clumping or mold growth. Wear gloves when handling dried chips to avoid transferring oils or bacteria. These simple habits preserve snack safety & extend shelf life of your creations, making your Easy DIY Vegetable Dehydrator Recipe both tasty & trustworthy.
Hygiene Checklist
| Task | Frequency |
|---|---|
| Sanitize cutting board | Before each use |
| Clean dehydrator trays | After every batch |
| Inspect produce | When selecting |
| Store spices | In airtight jars |
| Wash hands/gloves | Pre- & post-handling |
Self Experience: My Journey with DIY Veggie Chips
I remember the first time I tried Dehydrating Veggies for Chips: Easy DIY Vegetable Dehydrator Recipe in my cramped kitchen corner. I assembled a rickety wooden frame & pressed my old box fan against it, skeptical that zucchini slices could emerge crisp & flavorful. Yet after eight hours of gentle hum & warm air, I snapped open the door & inhaled the nutty aroma of freshly dried sweet potato. The initial batch taught me patience & the value of small adjustments thinner cuts for faster drying, a drizzle of olive oil to carry spices, & a shift to daylight for cooler endurance. Each experiment felt like a mini revelation, from kale leaves that lightened as chips to beet rounds that deepened into candy-red crisps. This hands-on approach became a weekend ritual, feeding a passion for healthy snacking that still energizes me every time I load a fresh tray into my DIY dehydrator.

Conclusion
Now that you have learned how to make your own veggie chips at home, you can enjoy a healthy snack anytime. Drying thin slices of carrots, zucchini, sweet potatoes, or beets gives you a crispy treat that stays fresh in an airtight jar. You can pick spices you love or try a mix of salt, pepper, & herbs. The process is simple: slice, season, & let the dehydrator work its magic. Soon you will have colorful, crunchy chips without added fats. This method saves money & cuts down on waste. Give it a try, & enjoy homemade veggie chips daily.